INSTALL · FIRST LAUNCH

安装与首次启动。Install and start.

从官方入口下载,阅读首次协议,按需授权并完成第一扫;分别查看 Android、iOS 与鸿蒙的安装条件和界面。Use the official release entry, review the agreement, grant needed access and finish a first scan. Choose Android, iOS or HarmonyOS for the correct requirements and interface.

选择与你的手机一致的平台;切换后显示该平台的完整专题步骤。Choose your phone platform to see its complete topic instructions.

安装前准备Before installation

准备一台 Android 6.0 或更高版本的手机,以及可以访问 Google Play 的网络。进入手机“设置 → 关于手机”查看 Android 版本;不同品牌的菜单名称可能略有差异。Prepare a phone running Android 6.0 or later and a network that can access Google Play. Check the Android version in Settings → About phone; menu names vary by manufacturer.

蓝牙 HID 需要 Android 9 及以上Bluetooth HID requires Android 9 or later

需要让手机作为蓝牙键盘连接电脑时,系统必须支持 HID Device,且至少为 Android 9。Android 6~8 可以使用 Wi-Fi 局域网模式,扫码和本地历史也可以独立使用。Using the phone as a Bluetooth keyboard requires Android 9 or later and system HID Device support. Android 6–8 can use the local Wi-Fi mode; scanning and local history also work independently.

本教程对应手机扫码枪 Android 1.0.0;截图来自 Android 实机。iOS、鸿蒙的安装入口和权限界面不同,请在教程中心选择对应平台。This guide covers Scan Input for Android 1.0.0 and uses screenshots from a real Android phone. iOS and HarmonyOS have different installation and permission screens; select the matching platform in the guide center.

通过 Google Play 安装Install from Google Play

01

打开官方应用页面Open the official app page

点击下方 Google Play 按钮,或在 Android 手机上的 Google Play 搜索“手机扫码枪”。确认应用属于深圳市信言软件工作室;官方页面地址中的应用标识为 com.xinyanruanjian.droidcodescanner。Use the Google Play link below, or search for Scan Input in Google Play on your Android phone. Check that the app is from Shenzhen Xinyan Software Studio. Its official app ID is com.xinyanruanjian.droidcodescanner.

02

点击“安装”,完成后点击“打开”Tap Install, then Open

在 Google Play 页面点击“安装”,等待下载和安装完成,再点击“打开”,或从手机桌面打开手机扫码枪。Google Play 安装不需要开启“安装未知应用”权限。Tap Install in Google Play and wait for the download and installation to finish. Tap Open, or launch Scan Input from your home screen. Installing through Google Play does not require permission to install unknown apps.

官网不提供 APK 直链No APK download on this website

官网的 Android 下载入口指向 Google Play。若设备无法访问该商店,请先解决 Google Play 访问问题;本教程不包含侧载 APK 流程。The Android download link on this website opens Google Play. If your phone cannot access the store, resolve that access issue first. This guide does not include APK sideloading.

首次启动:协议和教程入口First launch: agreements and guide

03

在欢迎弹窗中阅读协议Read the documents in the welcome dialog

首次打开会出现“欢迎使用手机扫码枪”。分别点击“查看用户协议”和“查看隐私政策”阅读文档,阅读后返回欢迎弹窗。On first launch, the Welcome to Scan Input dialog appears. Open View user agreement and View privacy policy to read both documents, then return to the welcome dialog.

04

选择“同意并继续”Choose Agree and continue

理解并接受协议后点击“同意并继续”,进入应用。“不同意并退出”会关闭应用;下次打开仍需完成该步骤。After reading and accepting the documents, tap Agree and continue to enter the app. Decline and exit closes the app; you will need to complete this step when you open it again.

Scan Input Android user agreement reading screen
点击“查看用户协议”进入阅读页;以后也可从设置页再次打开协议。View user agreement opens the reading screen. You can also reopen this document from Settings.
05

查看使用教程,或稍后查看View the user guide, or view it later

同意协议后会出现“开始使用手机扫码枪”提示。点击“查看使用教程”打开官网教程,或点击“稍后查看”继续使用。以后可在底部“设置 → 使用教程”再次打开教程。After accepting, the Get started with Scan Input prompt appears. Tap View user guide to open the official guides, or View later to continue. You can reopen the guides from Settings → User guide.

第一次扫码:允许相机权限First scan: allow camera access

06

点击底部中央扫码按钮Tap the center scan button

进入主界面后,底部有“历史”、中央扫码按钮和“设置”。点击中央扫码按钮进入独立扫码页;首次使用时,Android 会请求相机权限。The main screen has History, a center scan button, and Settings along the bottom. Tap the center button to open the scanner. Android requests camera permission when you use it for the first time.

07

在系统弹窗中允许相机访问Allow camera access in the system dialog

在本机示例中选择“仅在使用中允许”,或系统提供的相应允许选项。权限名称由 Android 版本和手机厂商决定。允许后,扫码页会显示实时相机画面。Choose While using the app or the equivalent allow option offered by your system. The wording depends on Android version and manufacturer. Once allowed, the scanner displays a live camera preview.

Android camera permission request for Scan Input
首次进入扫码页时按系统提示允许相机;实际按钮文案以你的手机为准。Allow camera access when the system prompts you. The exact button wording may differ on your phone.
刚才选择了拒绝?Denied the request?

扫码页会显示相机权限提示,点击“授权相机权限”重新请求。如果系统不再弹出权限窗口,进入“系统设置 → 应用 → 手机扫码枪 → 权限 → 相机”允许,再返回应用。无需为相机扫码授予全部照片或存储权限。Tap Grant camera permission on the scanner permission screen to request access again. If the system stops showing the dialog, allow Camera in system Settings → Apps → Scan Input → Permissions, then return to the app. Camera scanning does not require full photo or storage access.

蓝牙所需的系统权限会在使用蓝牙连接流程时另行提示。完成相机授权后,可以先扫码并查看本地历史,再选择电脑连接方式。Bluetooth-related system permissions are requested separately during Bluetooth setup. After allowing the camera, you can scan and inspect local history before choosing a computer connection.

确认安装和首次设置完成Verify installation and first setup

  • 点击中央扫码按钮后出现相机画面,顶部有“返回”和“切换”,底部有“闪光灯”、关闭按钮与“相册识别”。The scanner shows a camera preview, Back and Switch at the top, and Flashlight, a close button, and Scan from gallery at the bottom.
  • 扫码成功后,结果出现在扫码页底部,扫码页仍保持打开。点击返回后,可在“历史”页看到内容、类型和时间。After a successful scan, the result appears near the bottom and the scanner stays open. Return to History to see its content, type, and time.
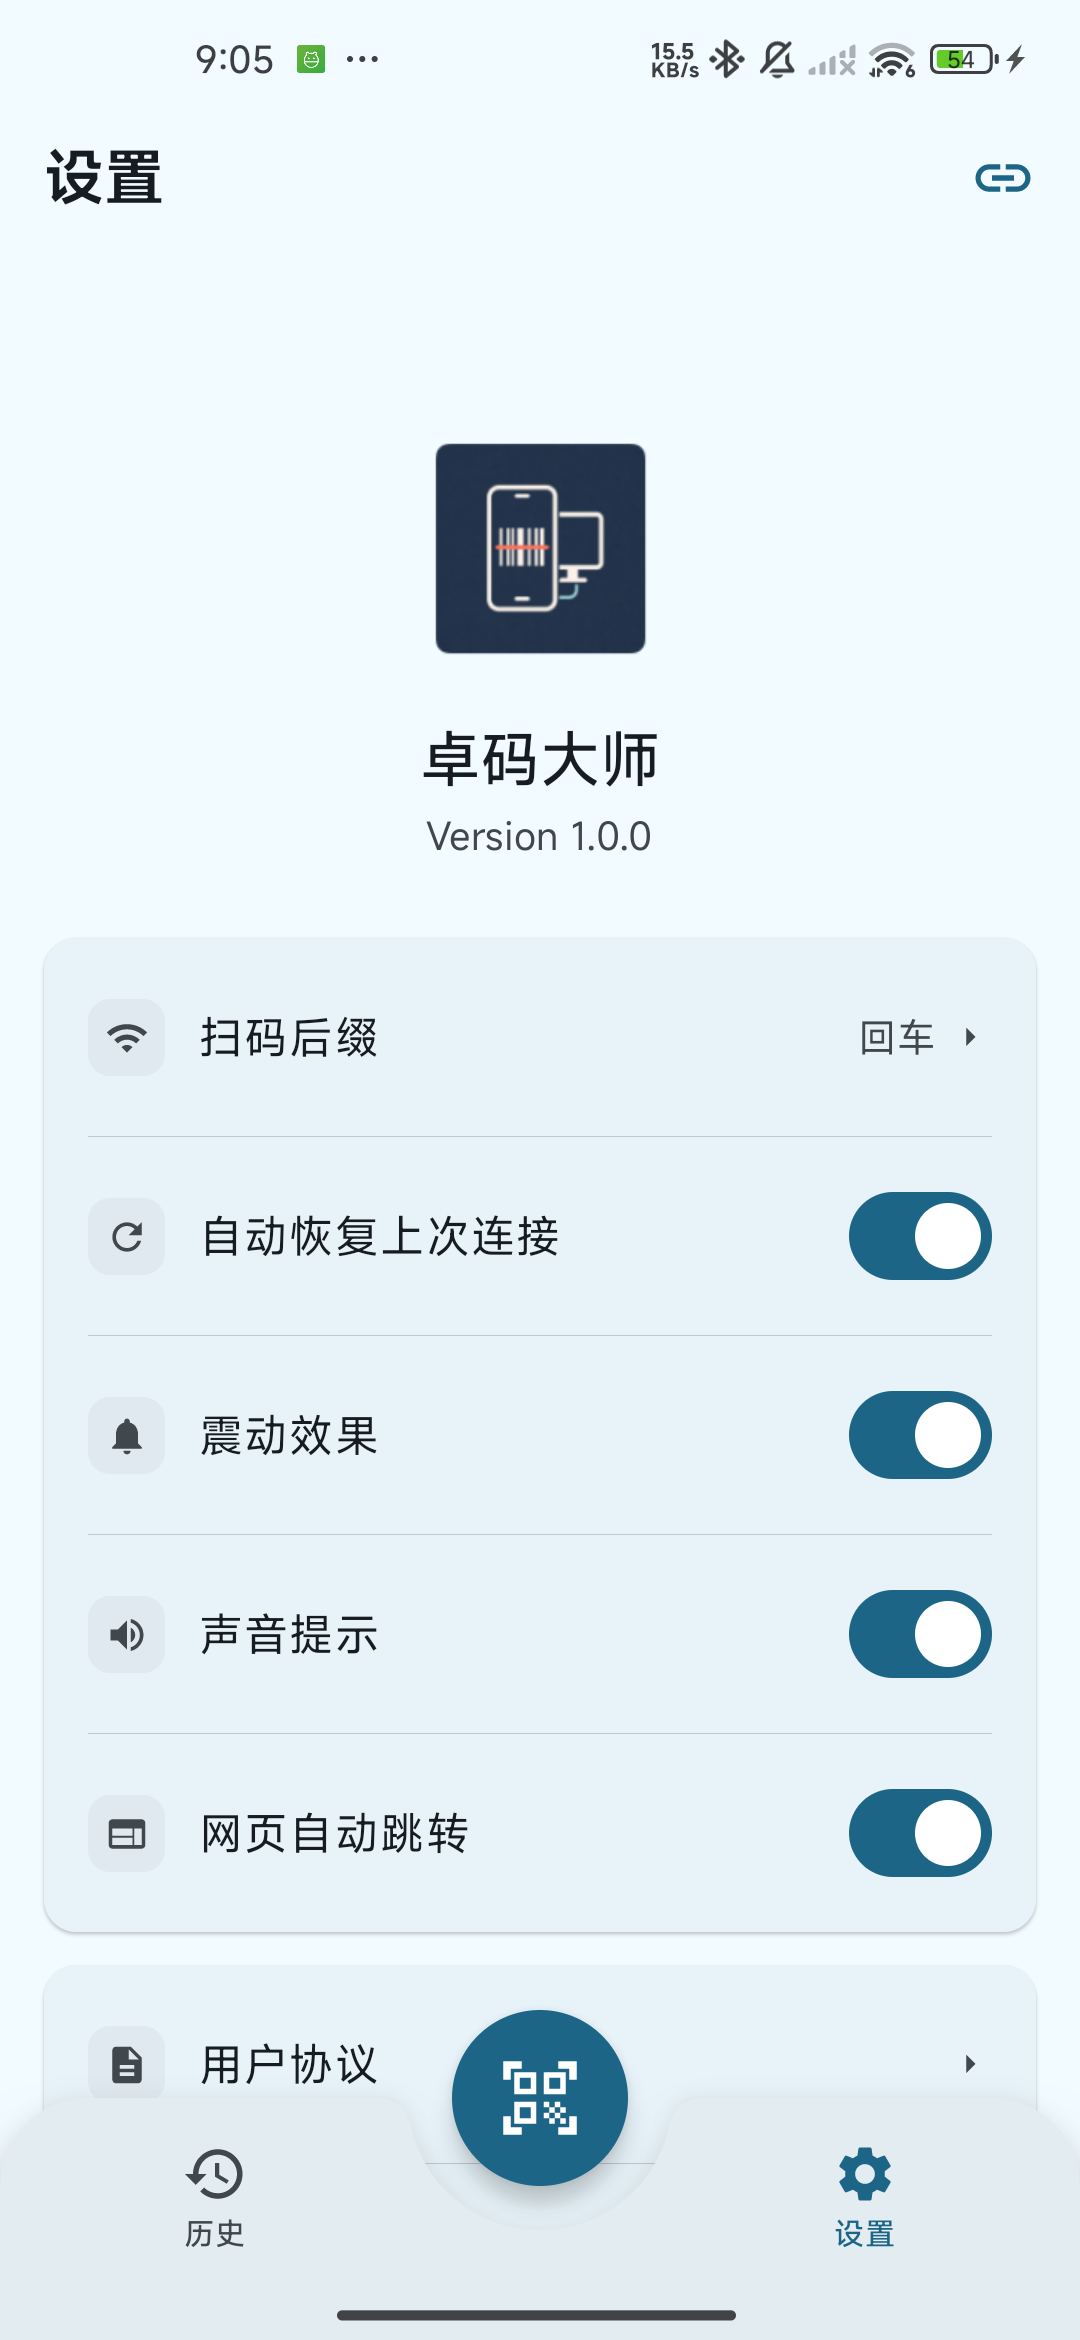
  • 打开底部“设置”,查看版本信息和“扫码后缀”“自动恢复上次连接”“震动效果”“声音提示”“网页自动跳转”等选项。Open Settings to check the version and options for scan suffix, automatic connection restoration, vibration, sound, and webpage opening.
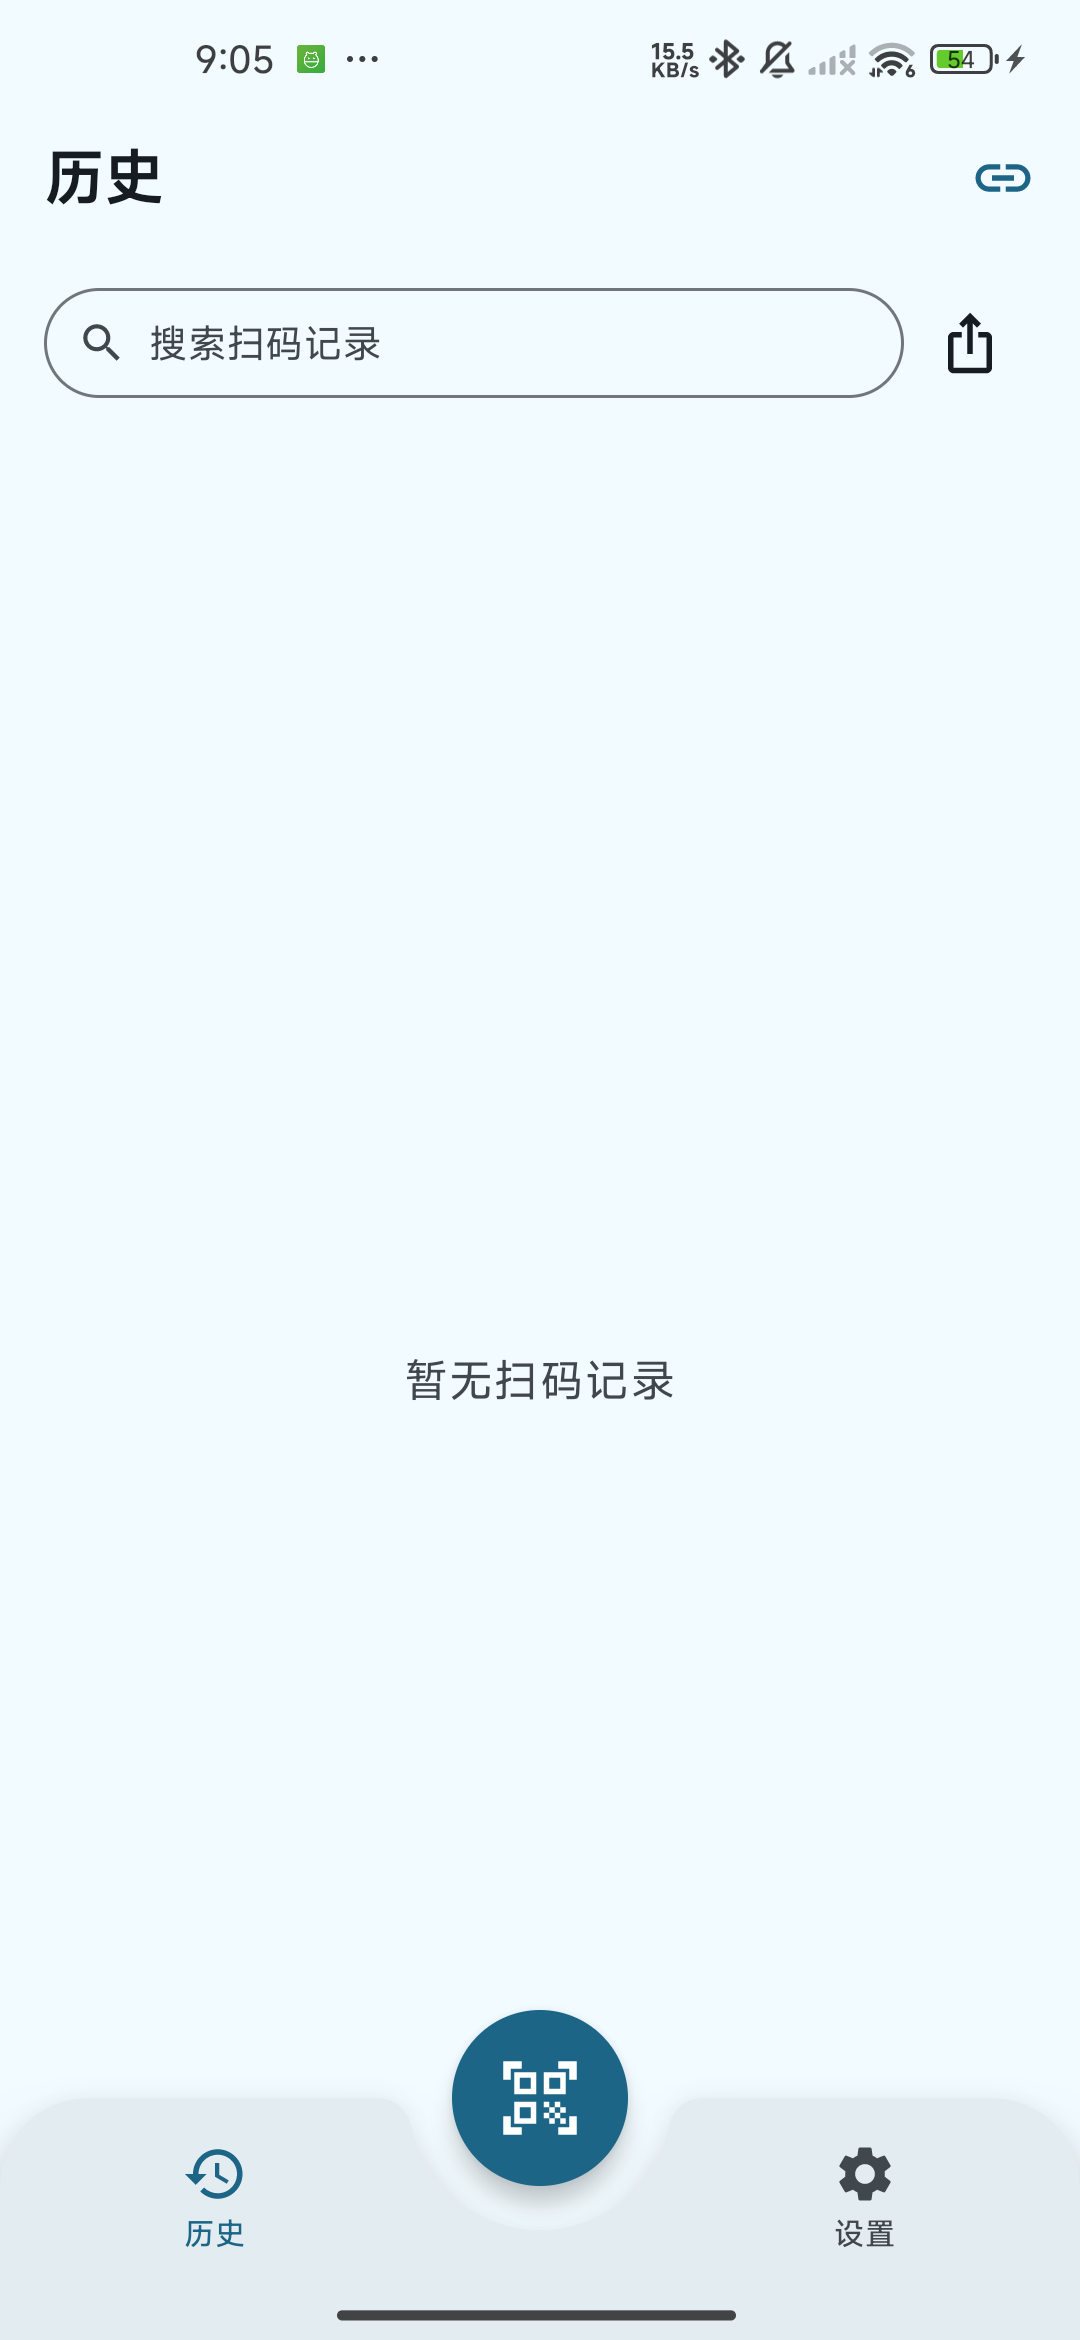
Scan Input Android history home screen
历史页用于查看记录,底部中央按钮进入扫码。Use History to review scans, and the center button to open the scanner.
Scan Input Android settings screen with app version
设置页显示版本号,并提供扫码行为和教程入口。Settings shows the app version, scan preferences, and the user guide link.
下一步:选择连接方式Next: choose a connection method

已经可以在手机上扫码。需要把结果输入电脑时,继续 Android 全流程中的蓝牙 HID 或 Wi-Fi 连接步骤;只在手机上采集时,可直接继续扫码、历史与导出教程。You can now scan on the phone. To type results into a computer, follow the Bluetooth HID or Wi-Fi steps in the complete Android guide. For phone-only collection, continue with scanning, history, and export.

安装与权限常见问题Installation and permission questions

Google Play 中找不到或无法安装Google Play cannot find or install the app

通过本页官方 Google Play 链接重新打开,并检查网络、Google Play 可用性和 Android 系统版本。安装入口以该商店页面为准;官网没有 APK 下载按钮。Reopen the official Google Play link on this page and check your network, Google Play access, and Android version. The store listing is the installation source; the website has no APK download button.

相机预览黑屏或仍提示权限The camera preview is black or permission is still required

确认已允许相机权限,关闭其他占用相机的应用,再退出扫码页重新进入。若系统权限已被永久拒绝,请在系统应用设置中修改;更换到前置摄像头后黑屏时,可切回后置摄像头。Check camera access, close other apps using the camera, then leave and reopen the scanner. If permission was permanently denied, change it in system app settings. If the front camera is unavailable, switch back to the rear camera.

接受协议后还能再查看吗?Can I read the documents again after accepting?

可以。进入“设置”,点击“用户协议”“隐私政策”或“使用教程”即可再次查看。Yes. Open Settings and choose User agreement, Privacy policy, or User guide to view them again.
下载安装前,先核对发布入口Check the release entry before installation

iOS 版支持 iPhone 和 iPad,当前工程要求 iOS 17.0 及以上。本教程使用 iOS 模拟器中的开发版本演示界面,模拟器截图不表示已经在 App Store 上线。The iOS app supports iPhone and iPad and the current project requires iOS 17.0 or later. This guide illustrates a development version in the iOS Simulator; the screenshots do not imply an App Store release.

  1. 在官网下载区查看 iOS 卡片;当前标为“即将上线”时,请等待官方发布入口,不使用 Android APK 或鸿蒙安装包。Check the iOS card in the website Download section. If it says Coming soon, wait for an official release entry. Android APK and HarmonyOS packages cannot install this app on iOS.
  2. 官方提供 App Store 或测试分发入口后,在 iPhone / iPad 打开该入口,核对应用名称与开发者,再按系统提示安装。已获得官方测试版本的用户可以从下一步开始。When an official App Store or test-distribution entry is available, open it on the iPhone/iPad, check the app and developer, and follow the system’s installation steps. Users with an official test version can continue below.
  3. 应用本身无需注册账号;如系统商店需要 Apple 账户,按商店自己的提示操作。首次使用可先仅在手机保存记录,连接电脑稍后设置。The app itself requires no account. Follow the store’s own prompts if it requires an Apple account. You can first save local records and set up a computer connection later.

首次启动、协议与主界面First launch, agreement and main screen

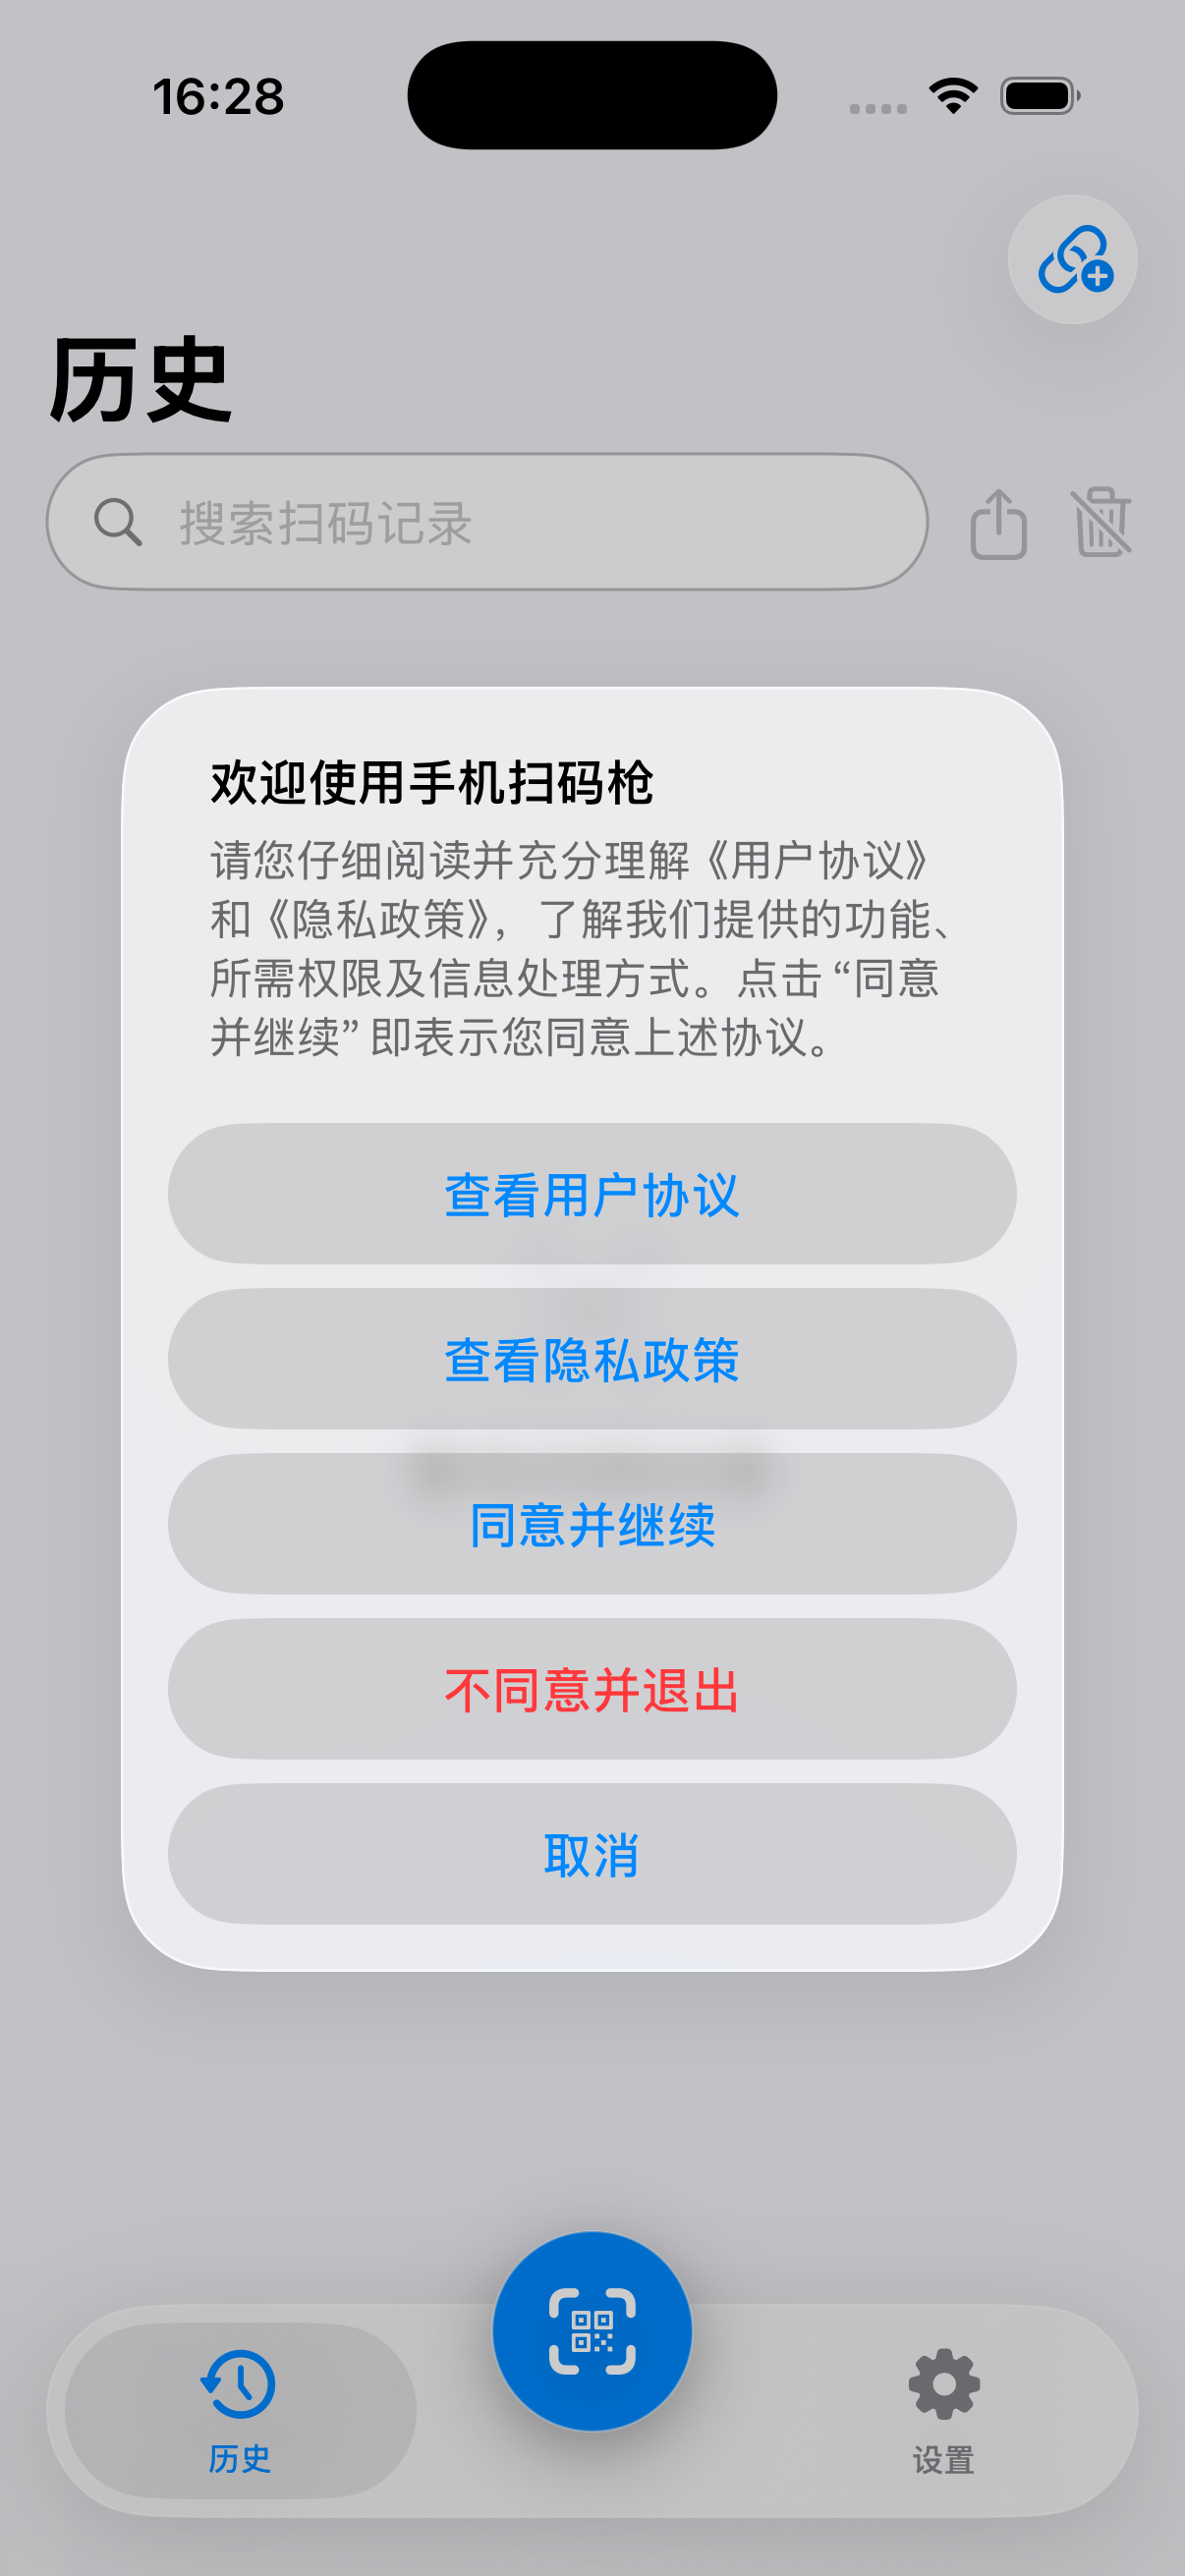
  1. 打开“手机扫码枪”,在“欢迎使用手机扫码枪”弹窗点“查看用户协议”和“查看隐私政策”阅读正文,返回后决定是否接受。Open Scan Input and use View User Agreement and View Privacy Policy in the welcome alert to read the documents, then decide whether to accept.
  2. 接受后点“同意并继续”,下一提示可选“查看使用教程”或“稍后查看”。同意状态会保存在本机;当前开发版本的“不同意并退出”会重新显示欢迎弹窗。Tap Agree and continue if you accept. The next prompt offers View user guide or View later. The app stores acceptance locally; Decline and exit in the current development version presents the welcome alert again.
  3. 默认进入“历史”。底部左侧“历史”、中央圆形“扫码”、右侧“设置”;右上连接状态图标负责 Wi-Fi 连接,未连接时显示链环加号图标。首次无历史记录是正常状态。The app opens History. The bottom bar has History on the left, the round Scan control in the center and Settings on the right. The top-right connection status icon controls Wi-Fi and shows a link with a plus badge when disconnected. An empty history on first use is normal.

协议页也能从“设置 → 用户协议 / 隐私政策”再次打开。iOS 版当前仅支持 Wi-Fi 连接电脑,蓝牙键盘输出请使用其他支持 HID 的手机平台。Reopen the documents from Settings → User Agreement / Privacy Policy. iOS currently connects to a computer only over Wi-Fi; use a supported phone platform for Bluetooth keyboard output.

iOS 模拟器首次欢迎弹窗提供协议与隐私政策入口,阅读后再决定是否接受。
iOS 模拟器首次欢迎弹窗提供协议与隐私政策入口,阅读后再决定是否接受。The iOS Simulator welcome alert links to the agreement and privacy policy for review before acceptance.

按使用场景授权相机与本地网络Grant camera and local-network access when needed

  1. 点“扫码”。尚未连接电脑时会看到“尚未连接 PC 端”,选“继续扫码”保存本机记录,或“立即连接”进入 Wi-Fi 设置;“不再提示”可关闭以后这类提醒。Tap Scan. When disconnected, the Not connected to PC reminder offers Continue scanning for local records or Connect now for Wi-Fi setup. Don’t remind me again suppresses this reminder.
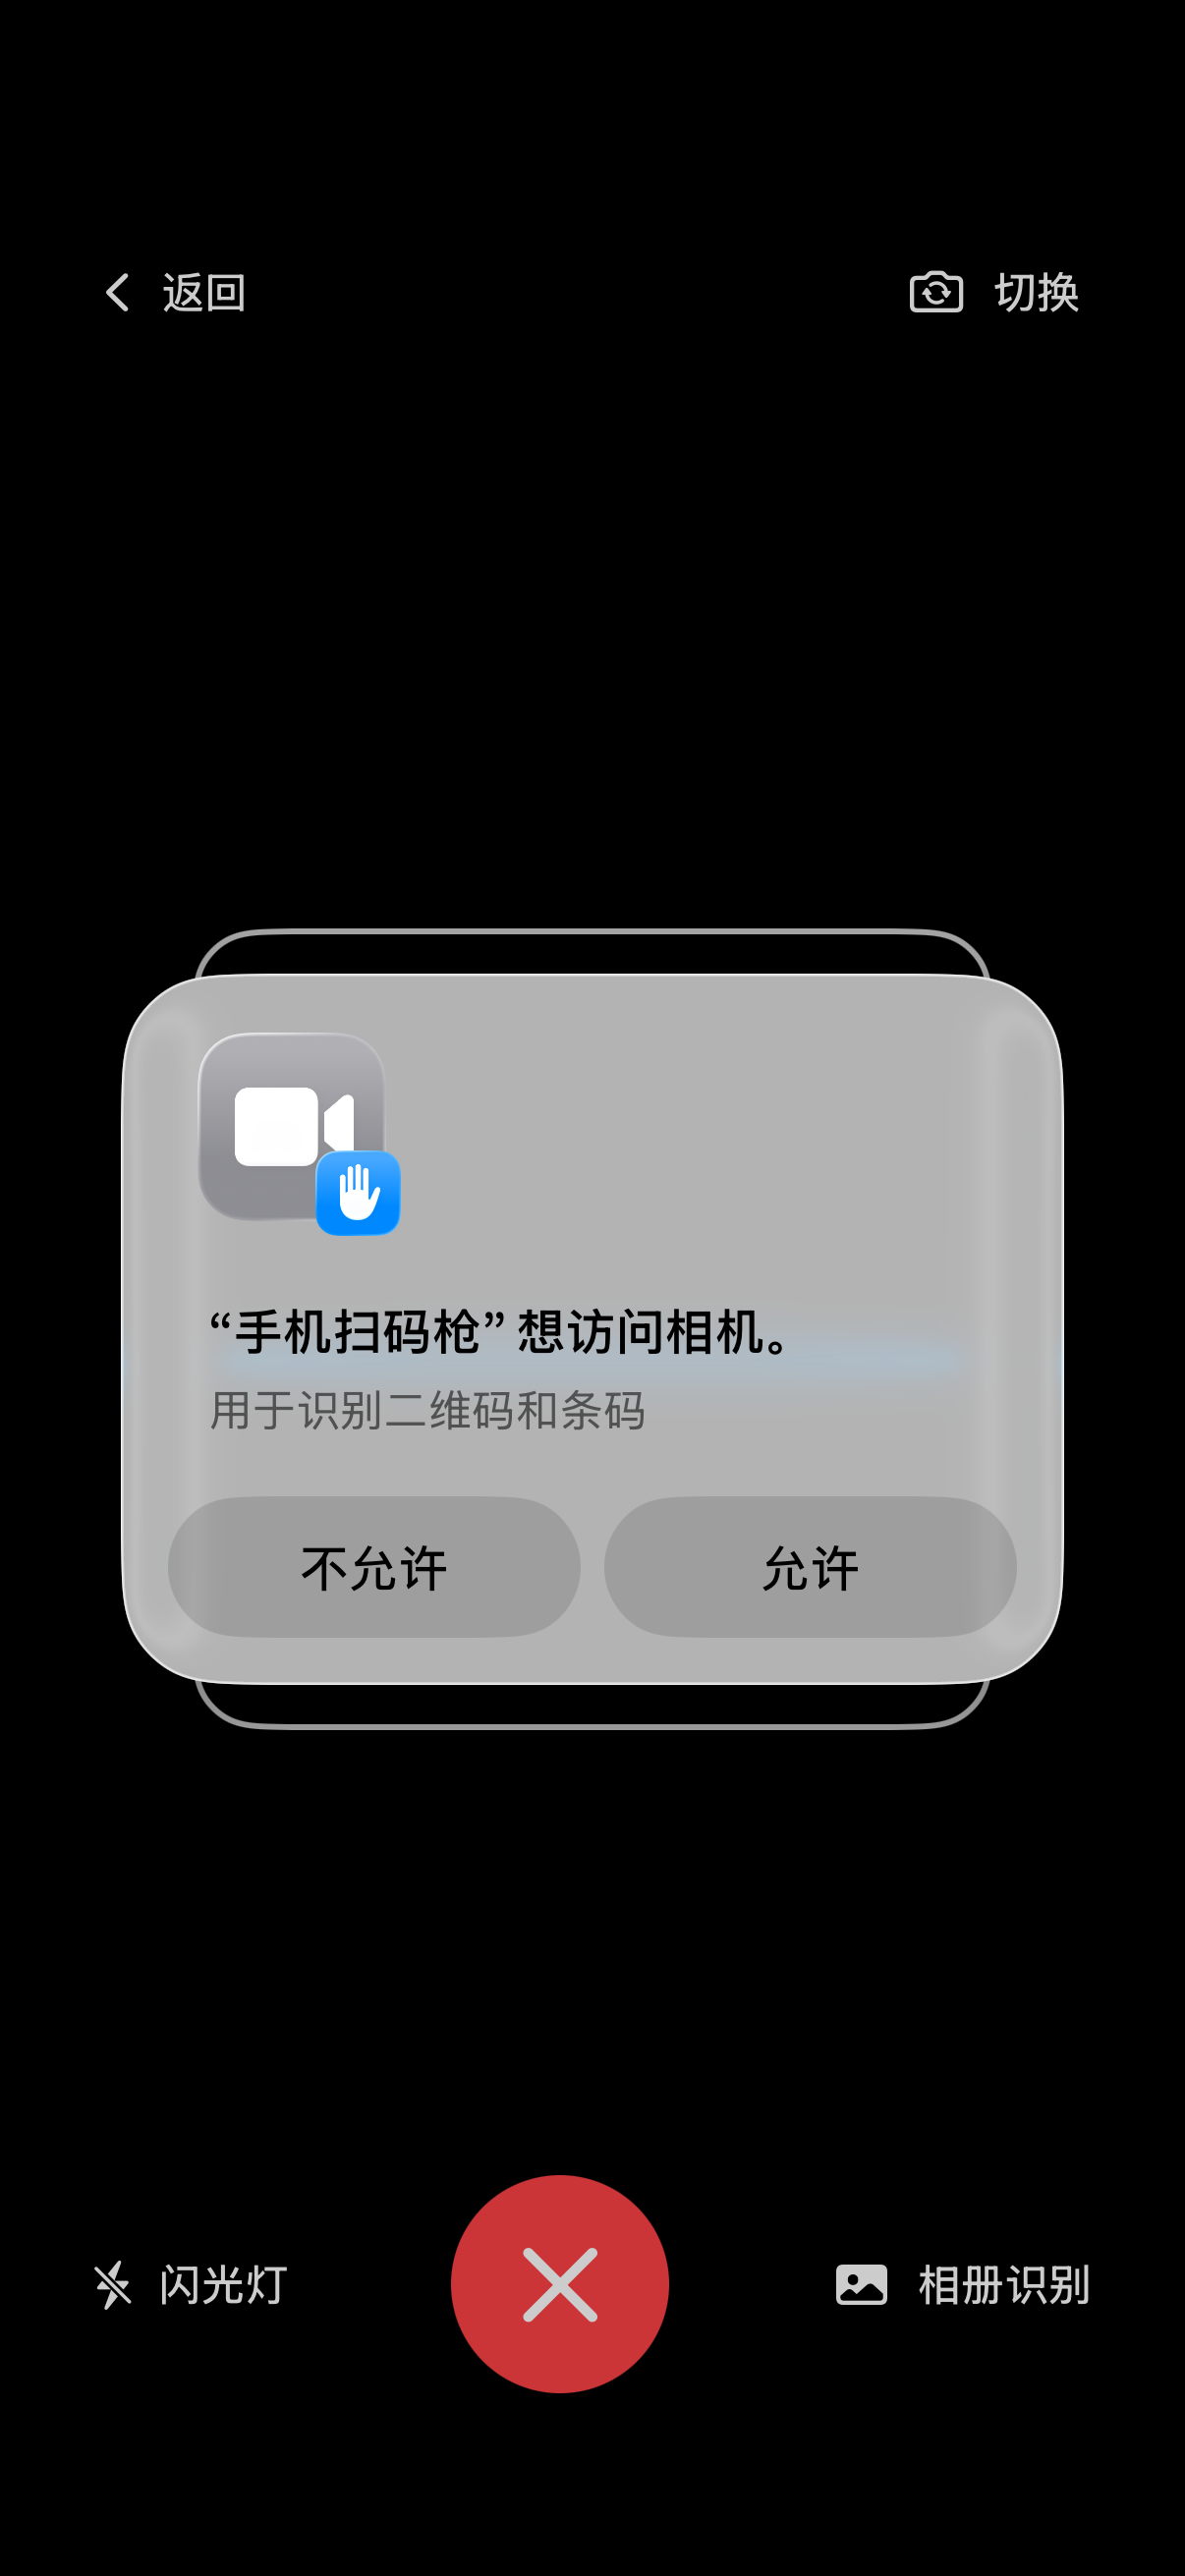
  2. 首次使用相机时允许系统相机权限。拒绝后扫码页提示“需要相机权限以进行扫码”,点“授权相机权限”打开系统设置并允许,再回 App。Allow the system camera prompt when first using the camera. After denial, the scanner displays Camera access is required; Grant camera access opens system Settings. Enable access and return.
  3. 相册识别使用系统照片选取器,只选择一张图片,无需授权全部图库。取消选图后回到扫码页,不会新增记录。Gallery recognition uses the system photo picker for one image and does not require full-library access. Canceling selection returns to scanning without a new record.
  4. 首次连接局域网电脑时允许“本地网络”。曾拒绝时,到系统“设置 → App → 手机扫码枪”(部分系统版本入口不同)重新允许本地网络;相机也在对应 App 设置中管理。Allow Local Network when first connecting to a computer on the LAN. If denied, enable it in system Settings → Apps → Scan Input (the route varies by iOS version). Camera permission is managed in the same app settings.
模拟器与真机相机有差异Simulator camera limitation

iOS 模拟器没有真实相机,已授权仍可能显示相机不可用或授权提示。教程中的相册识别、历史与导出可在模拟器验证;相机对准实物码、闪光灯和实际震动须在真机检查。The iOS Simulator has no real camera and may still show an unavailable-camera or permission message after access is granted. Gallery recognition, history and export can be verified there; scanning physical codes, flash and actual vibration require a device.

首次打开相机时,iOS 系统请求相机访问;照片选取使用另一个系统选图器。
首次打开相机时,iOS 系统请求相机访问;照片选取使用另一个系统选图器。iOS requests camera access on first use. Selecting a photo uses a separate system picker.

完成首次使用检查Check that first use is complete

  1. 到“设置 → 扫码后缀”选择“无”“回车”或“Tab”,默认回车。后缀仅用于发送,手机历史保留原始内容。Choose None, Enter or Tab in Settings → Scan suffix; Enter is the default. The suffix affects transmitted text only, while History keeps the raw content.
  2. 用相机或相册识别一个已知码,到历史核对内容、格式与时间,并试一次复制。未连接电脑也可以完成这一步。Recognize a known code by camera or gallery, verify its content, format and time in History, then copy it. A computer connection is not required.
  3. 需要输入电脑时,按 iOS Wi-Fi 专题启动桌面端、连接并测试目标输入框。再按 扫码与导出专题完成系统保存。For computer typing, follow the iOS Wi-Fi topic to run the desktop service, connect and test a target field. Complete file saving with the scanning and export topic.

先选一条使用路线Choose your workflow

这份教程对应手机扫码枪鸿蒙版,覆盖从安装到保存导出文件的完整流程。第一次使用按“安装 → 设置 → 连接 → 扫码 → 历史与导出”操作;只在手机识别并保存内容,可以跳过连接电脑。This guide covers Scan Input for HarmonyOS, from installation to saving an exported file. For a first session, follow installation → settings → connection → scanning → history and export. Skip the computer connection if you only need local recognition and records.

用途Goal选择Mode准备条件Requirements
手机识别与保存Scan and save on the phone本地扫码,无需连接Local scanning, no connectionHarmonyOS 5.1.0 及以上;相机权限,或通过系统选图器选择一张图片HarmonyOS 5.1.0+; camera permission, or one image selected through the system photo picker
英文、数字、常见商品码录入电脑Type English, numbers or common product codes on a computer蓝牙 HIDBluetooth HID手机连接菜单中有“蓝牙 HID 连接”入口;电脑支持蓝牙键盘,无需安装电脑端The phone connection menu must offer Bluetooth HID; the computer must support Bluetooth keyboards. No desktop app is required
中文、混合文字或局域网录入Send Chinese or mixed text over the local networkWi-FiWi-Fi电脑运行手机扫码枪桌面端;手机与电脑在可互通的同一局域网Run Scan Input Desktop on the computer; phone and computer must be reachable on the same local network
本页截图与版本Screenshots and version

截图采集自 HUAWEI Mate 60 Pro,HarmonyOS 7.0.0,已安装应用包版本 1.0.1,界面为中文。点击图片可打开原图。此版本“设置”中的版本文字仍显示 1.0.0;核对安装版本时可查看系统应用信息。系统授权和文件保存窗口可能因设备而不同,设备名、IP、端口及示例内容请以自己的界面为准。Screenshots show a HUAWEI Mate 60 Pro running HarmonyOS 7.0.0 with installed app package 1.0.1 in Chinese. Click any image for the full-size screenshot. This package still displays 1.0.0 in Settings; use system app information to check the installed version. Permission and save dialogs can vary. Use your own device name, IP, port and sample content.

蓝牙入口以当前手机为准Check the Bluetooth entry on your phone

基础扫码、历史和 Wi-Fi 不需要蓝牙 HID。只有具备对应系统能力的设备才显示“蓝牙 HID 连接”;没有入口时可使用本地扫码或 Wi-Fi,不要按 Android 的系统版本条件判断鸿蒙手机。Local scanning, history and Wi-Fi do not require Bluetooth HID. The Bluetooth HID entry appears only on devices with the required system capability. If it is absent, use local scanning or Wi-Fi; Android version requirements do not apply to HarmonyOS.

下载、首次启动与权限Install, launch and grant permissions

01

从华为应用市场安装Install from Huawei AppGallery

在鸿蒙手机打开 华为应用市场官方页面,核对“手机扫码枪”及开发者信息,按系统提示安装并打开。也可以在官网“下载”区域选择 HarmonyOS。应用当前不要求注册账号。Open the official Huawei AppGallery page on your HarmonyOS phone, check Scan Input and its developer, then install and open it. The website Download section also links to HarmonyOS. The app currently requires no account.

02

阅读首次欢迎弹窗的协议Read the first-launch agreement

“欢迎使用手机扫码枪”弹窗提供“用户协议”和“隐私政策”入口。阅读并决定接受后点击“同意并继续”。未同意时无法继续使用;点击“不同意并退出”会提示“需要同意协议才能继续使用”。接着可选择“查看使用教程”,或“稍后查看”进入主界面。The Welcome to Scan Input dialog links to the User Agreement and Privacy Policy. Read them and tap Agree and continue if you accept. You cannot continue without acceptance; Decline and exit displays an agreement-required message. The next prompt offers View user guide or View later to reach the main screen.

手机扫码枪鸿蒙版用户协议正文
协议正文可从首次弹窗或“设置 → 用户协议”阅读;此图为正文页。Read the agreement from the first-launch dialog or Settings → User Agreement. This image shows the document page.
03

第一次扫码时允许相机Allow the camera on your first scan

点击主界面底部中央圆形扫码按钮,按 HarmonyOS 授权窗口允许使用相机。只有相机扫码需要相机权限;蓝牙权限在第一次打开蓝牙设备列表时申请,相册识别和导出分别由系统选图器、文件保存窗口处理。Tap the round scan button at the bottom center and allow camera access in the HarmonyOS prompt. Camera scanning needs camera permission. Bluetooth permission is requested when opening the Bluetooth device list; gallery recognition and export use the system photo picker and file-save window.

拒绝相机权限后如何恢复Recover after denying camera access

若显示“需要相机权限才能扫描二维码和条形码”或“相机权限申请失败,请点击重试”,先点“重试”重新授权。系统不再提示时,到手机“设置 → 应用 → 手机扫码枪 → 权限”允许相机,再回到扫码页重试。If the scanner says camera permission is required or its request failed, tap Retry to request access again. If the system no longer prompts, allow the camera under system Settings → Apps → Scan Input → Permissions, then return and retry.

安装完成检查Verify installation

底部能看到“历史”“设置”,中央按钮能打开相机预览;未连接电脑也可识别并保存扫码记录。Check that History and Settings are available and the center button opens the camera preview. Recognition and history work without a computer connection.

认识主界面Find the main controls

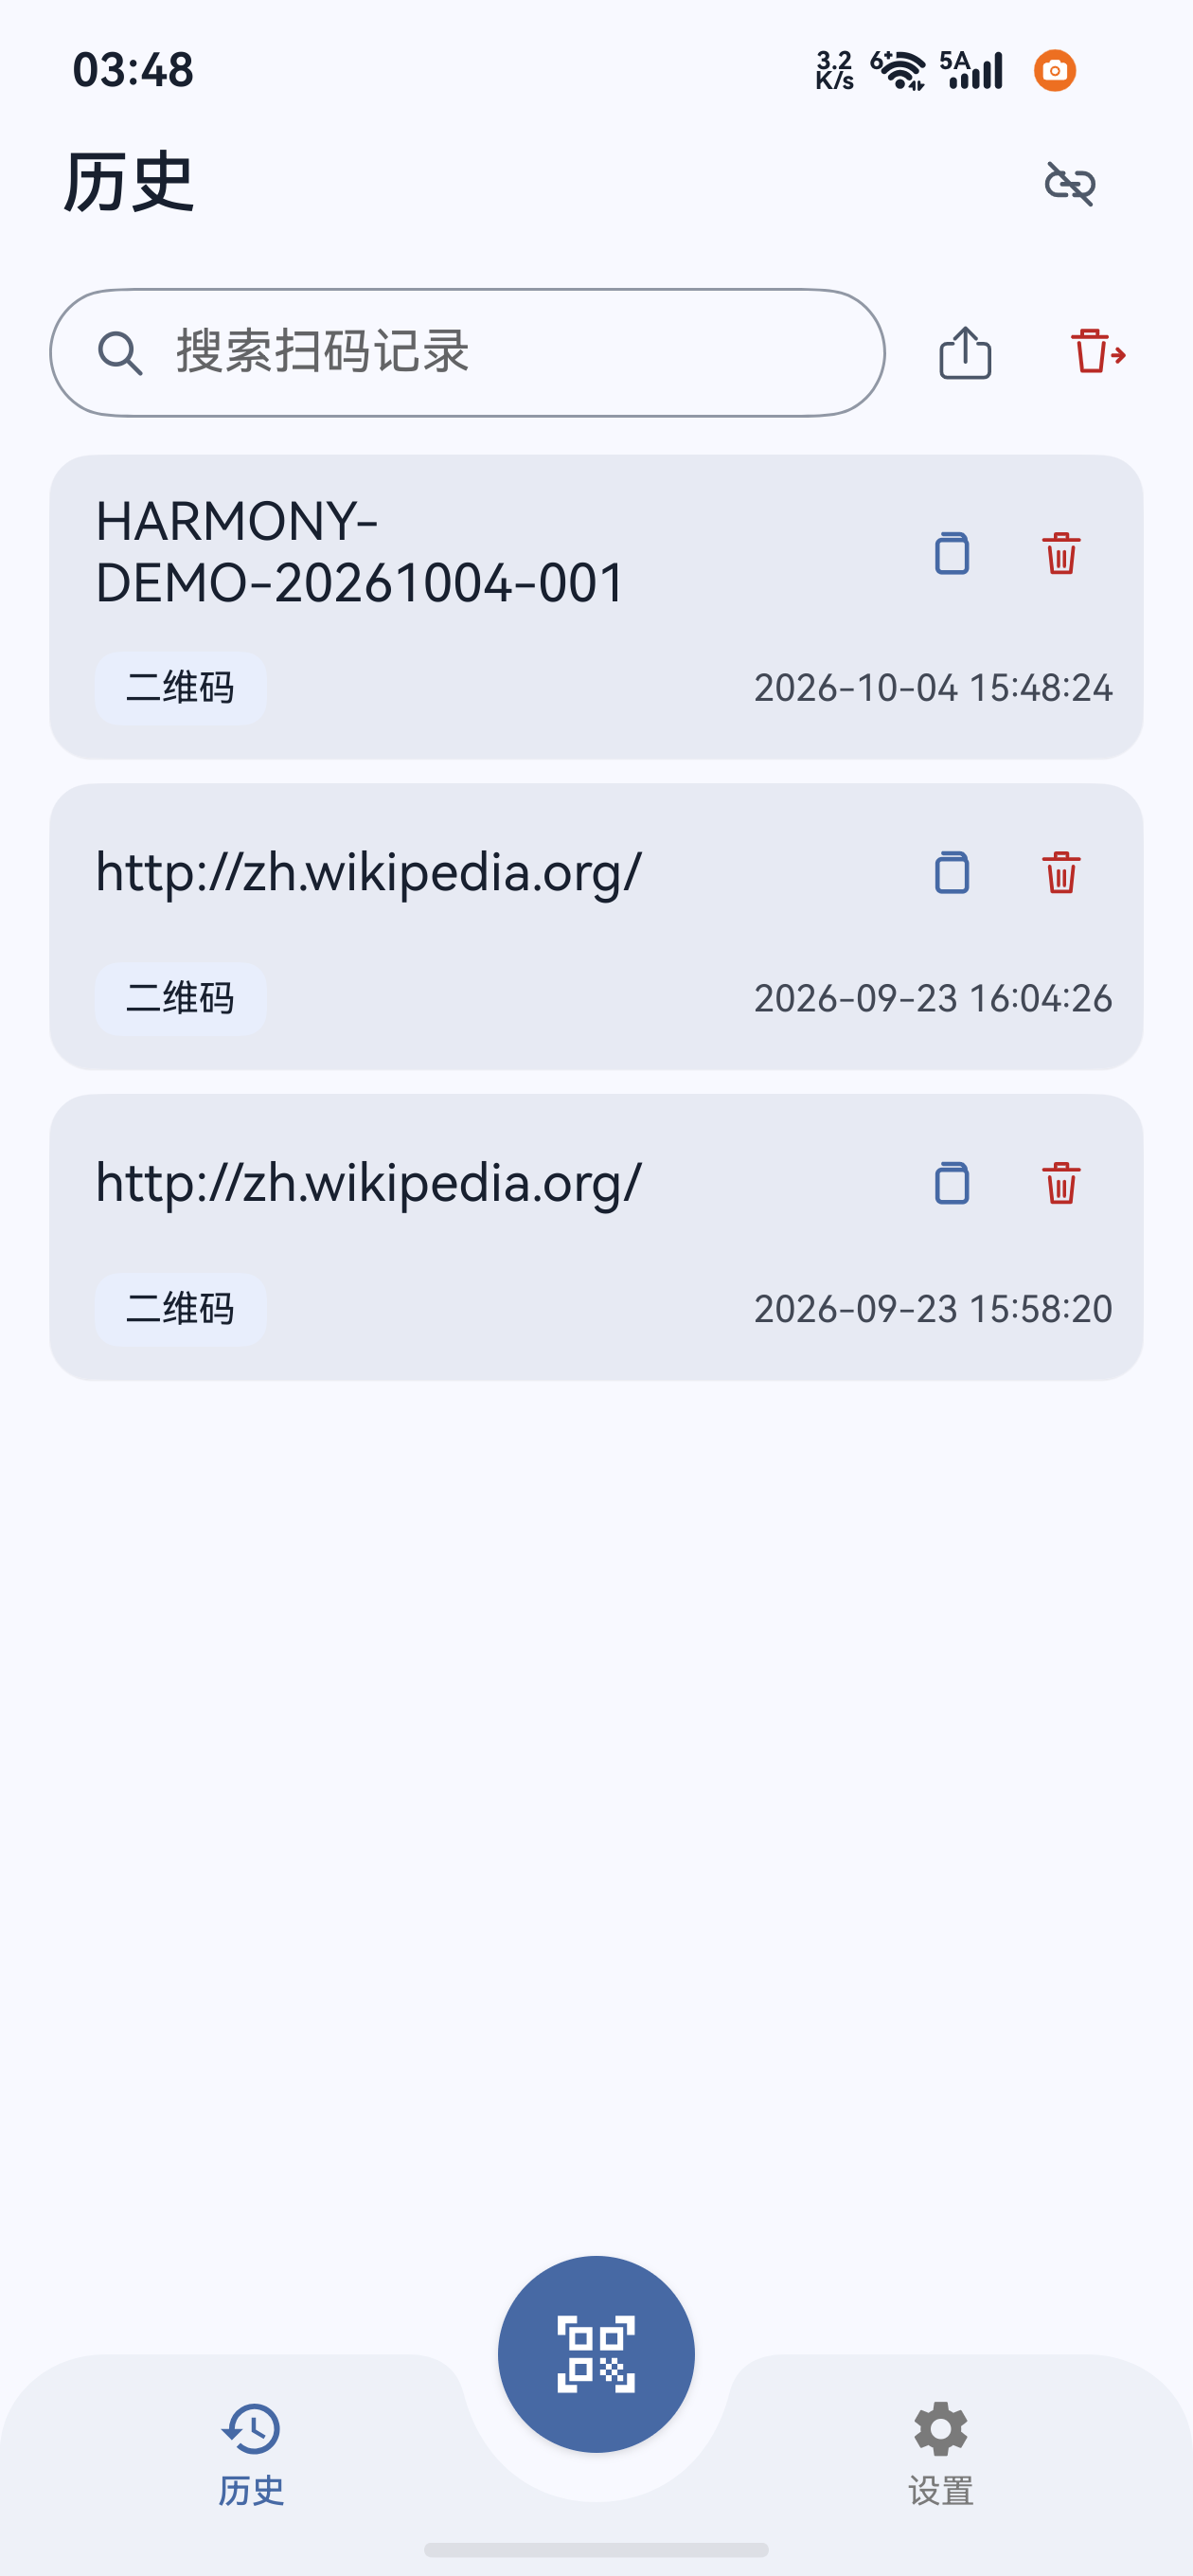
鸿蒙历史页的连接、搜索、导出和扫码入口
历史页:右上角链环连接电脑,搜索框右侧为导出与清空,底部中央进入扫码。History: the top-right link connects a computer; export and clear are beside search; the center button opens scanning.
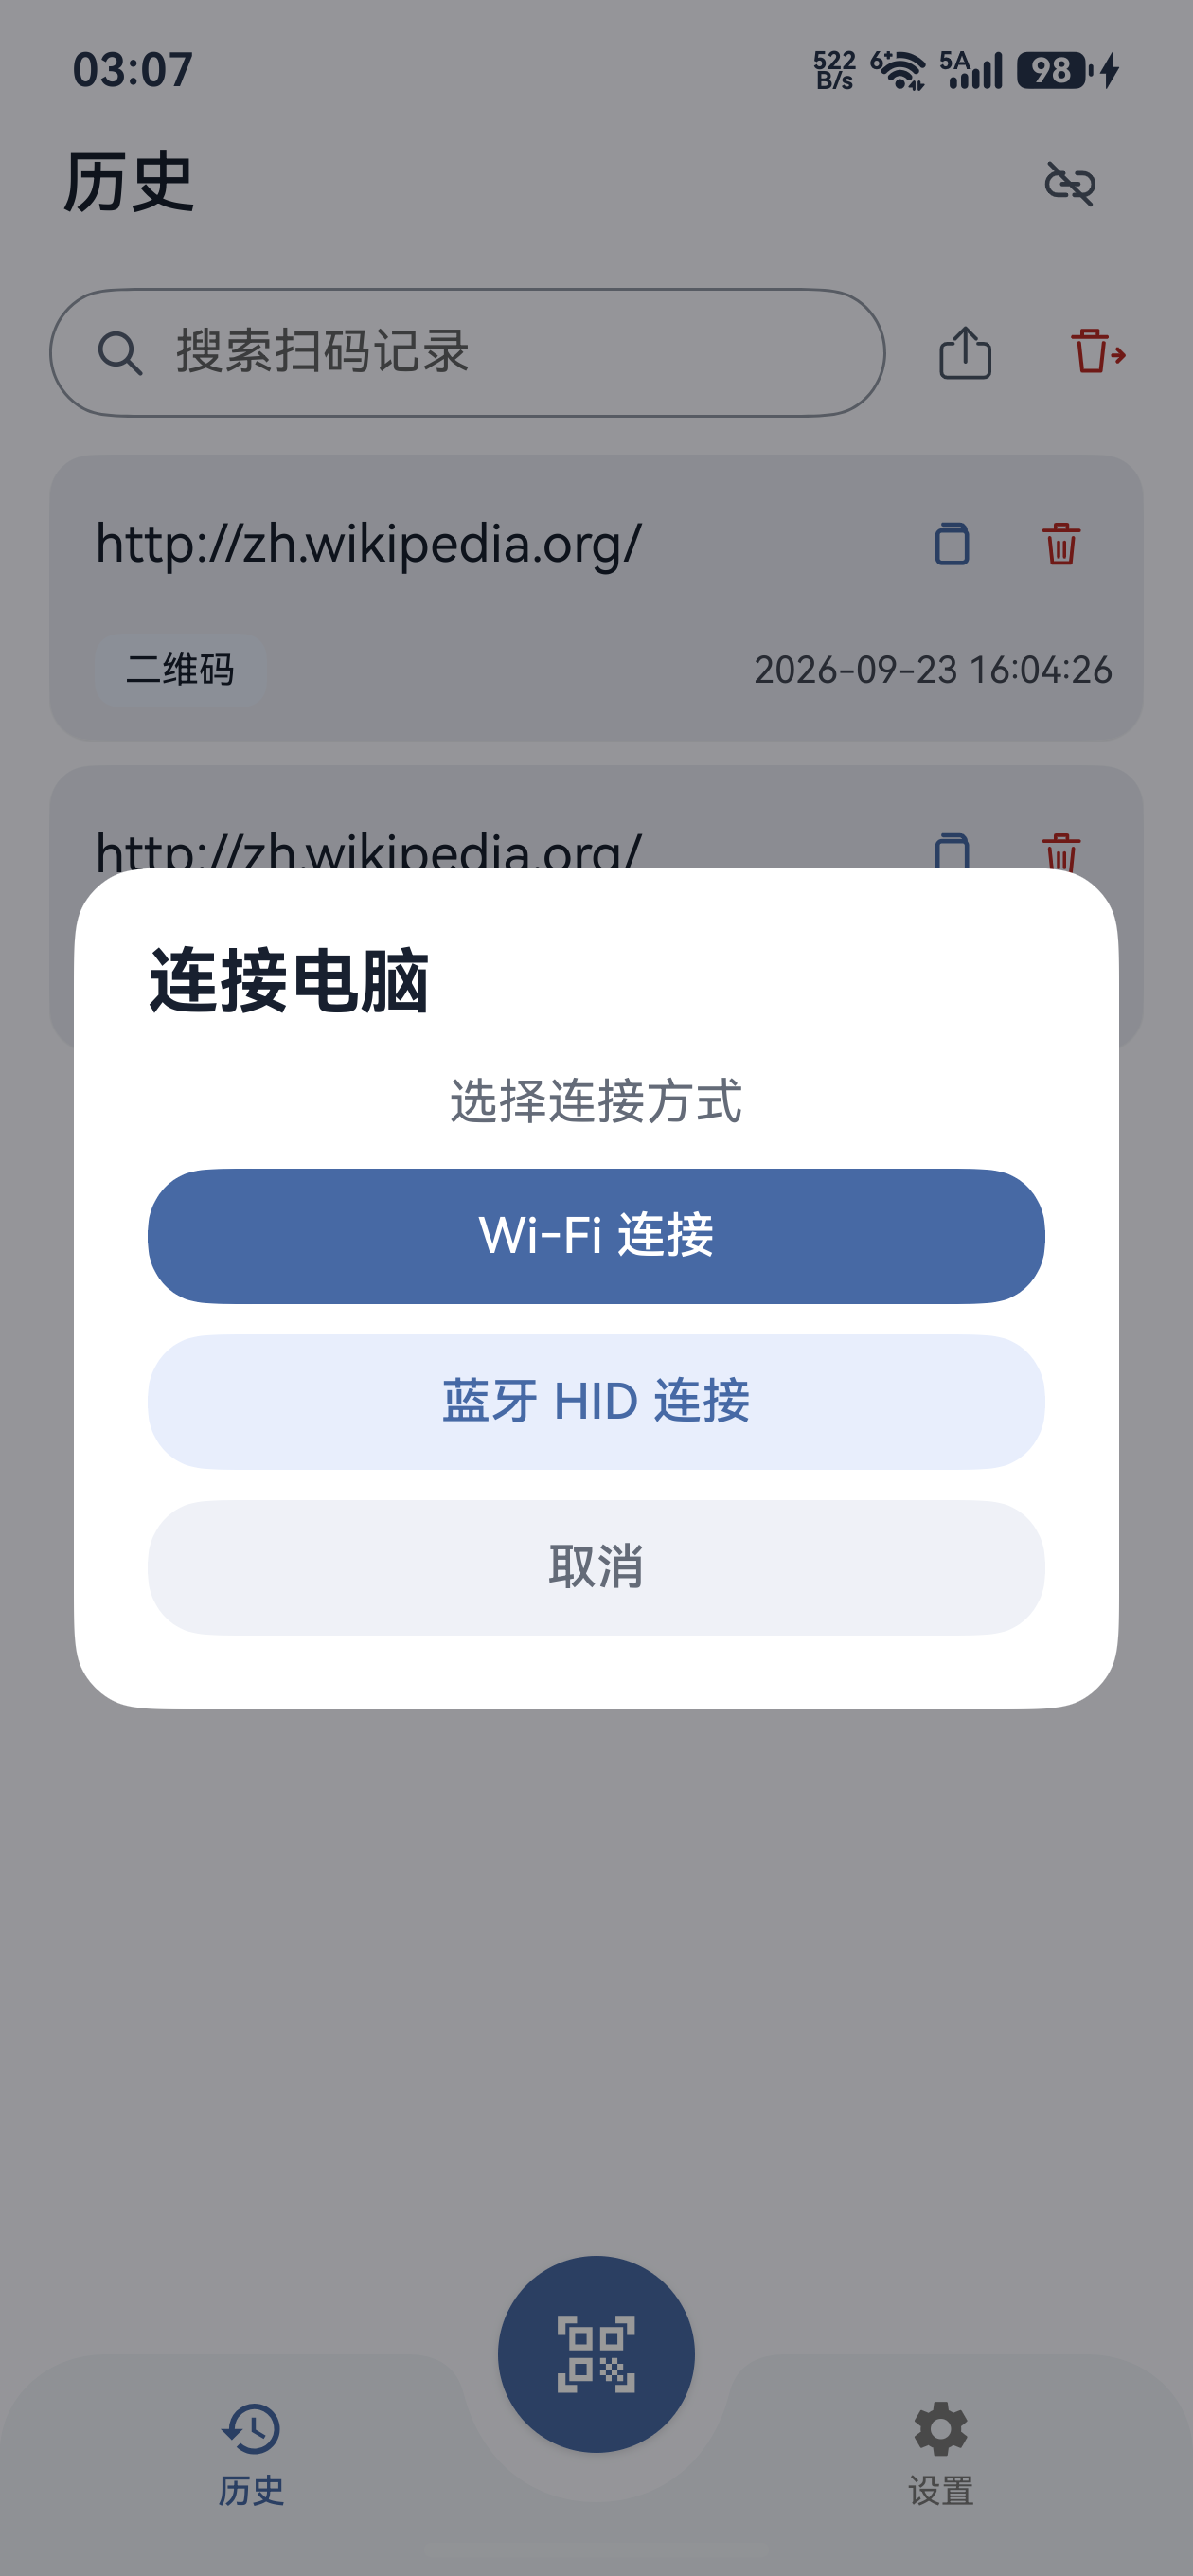
鸿蒙版电脑连接菜单
点击未连接的链环后选择 Wi-Fi 或蓝牙 HID;蓝牙入口是否显示取决于手机系统能力。Tap the disconnected link to choose Wi-Fi or Bluetooth HID. Bluetooth availability depends on the phone capability.
  • “历史”:最新记录在前,每条显示内容、格式与时间,右侧可复制或删除。History lists newest records first, with content, format and time plus copy and delete controls.
  • 底部中央圆形按钮:进入全屏扫码页;该页也提供“相册识别”。The center round button opens the full-screen scanner, which also offers Scan from gallery.
  • “设置”:后缀、自动恢复连接、震动、声音、网页跳转,以及协议、官网和电脑端下载。Settings provides suffix, connection restore, vibration, sound, webpage opening, legal documents, website and desktop download.
  • 右上角链环:断开时用于选择连接方式;连接后点击可查看“当前连接”并“断开当前连接”。连接中请等待结果。The top-right link selects a connection while disconnected. Once connected, tap it to inspect Current connection or Disconnect current connection. Wait for the result while connecting.
识别、发送、电脑打字分别核对Check recognition, receipt and typing separately

手机出现记录或提示音只说明识别到内容。蓝牙 HID 和 Wi-Fi 都需确认 App 已连接,以及电脑目标输入框出现完全一致的文字;Wi-Fi 还可在桌面端核对收到的记录。蓝牙 HID 直接作为键盘输入,不要求桌面端记录。A phone record or scan sound confirms recognition. For both Bluetooth HID and Wi-Fi, verify the app connection and identical text in the computer target field. With Wi-Fi, also check the received desktop record. Bluetooth HID types directly as a keyboard and does not require a desktop-app record.